Thursday, December 25, 2008

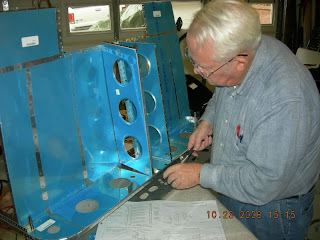
Fuselage progress from around 10/31...


I'm about a month behind in my posts but I'll attempt to make some kind of sense of our progress. We finally received the new part from Vans for the floorboard and got it installed; in the meantime, we skipped around a bit trying to do what we could so we didn't have much down time. I'll report on a page-by-page basis and the dates that we completed various steps. Please excuse the confusion, and excuse any repitition that I may be making.
On pg 21-14, we did step 1 on 11/2 and steps 2 through 7 and page 21-15 steps 2 through 4. We did separation of parts whenever we could, as in step 1, 8, and 9 at an earlier date. We found that doing as much dimpling as we could while we had a particular die in the squeezer, saved us a bit of time. On pg 21-16, I did a lot of the dimpling BEFORE we installed the the skins on the bottom.
On 11/6, we completed pages 21-18 and 19. On 11/8, we completed step 3 though 11. The bushings were a snap...
On 11/12, we did pg 21-20 and pg 22-02 though step 12. On 11/13 we did pg 22-03. I notice that we pg 22-04 on 11/12.
I have written that we did pg 22-05 on 11/28 which is clecoing and riveting the lower fuse assembly to the mid fuse and botom skin assembly.
The next part was really tricky; George had a friend at his local EAA chapter that had some equipment that helped him with the bendng of the longeron. We tried bending with a hammer but that was a joke. Anyway, on pg 23-02, it gives very exact directions on how to bend and to what specifications they were to be bent. TRUST ME! If you don't get it right, your plane will be weird looking. We got this stuff all done on 11/28.
We did pg 23-03 step 1 and 2 on 11/13 and step 3 and 4 and step 2 on pg 23-04 on 11/15. We did steps 3 though 8 on 11/21.
We did step 8 on pg 23-04 and stept 1 and 2 on pg 23-05 on 11/29. I used a Dremel to cut out the skin.
On 12/10 we did pg 23-06 stepts 1-8, except for the cut out parts, and we did those earlier. We ran out of LP 4-5's at this point and had to request some more. Alot of this date was spent on assembling and drilling and disassembling and deburring parts.
On 12/12, we did pg 24-02, the roll bar assembly. That took us our whole work day. We discussed priming it then, but in our finite wisdom, decided not to. (I ended up priming it later, AFTER it was installed...a truly stupid thng.) Whenever you see a step that has something to do with 'remove hatched area and separate', just figure that was done inbetween jobs or when one of us was doing another step where only one set of hands was required.
Page 23-07 and and 08 was done on 11/4, 12/18, and 12/4, as they were all sub-assemblies and didn't have to be done immediately at that point of assembly.
We did pg 26-02 on 12/2 and 12/3, also pg 26-03, and 04.
We completed pgs 27-01 through 03 on 12/3 and 12/4. We started the plumbing on pg 27-04 on 12/5. Pg 27-05 was completed on 12/14. Running the pipe through the fuselage was a bear.
We did 27-06 and 28-01 though 28-04 on 12/18.
I'll try to post some more tomorrow.

Wednesday, November 5, 2008

Fuselage Progress 10/28-11-4


On 10/28, worked on the floor assembly. On pg 21-09, make sure you put the bulkhead cap and roller in correctly on the LEFT and RIGHT side. (they go in differently on the opposite sides.). On pg 21-10, when we assembled the control column mount asembly, we had difficuly compressing the AD4-6 rivets to a flush mount, so we had to grind down the squeezed head so they were flush.
On 10/31, we started work on the bulkhead, F1203A, and everything was straight forward. When we attempted to install F1226R, we discovered that the curved flange was manufactured incorrectly and we called Vans so they could send us a new part. (step 7, pg 21-13.)
11/2, weinstalled the control column and flipped the fuselage over on a pair of 2x4's on the sawhorses.
And on 11/7, we started installing the bottom skins.

Sunday, October 26, 2008

RV 12 fuselage progress 10/25/08


We got over to pg 21-04, step 6 on the 24th. We had some trouble with the rivet squeezer making contact with some of the flanges on step 5 and 6 but we straightened them out with a large duck-bill pliars.
On the 25th, we got a little backwards with some of the pulley bracket assembly and the flaperon mixer arm assembly; we tried to put them in the wrong place.
On pg 21-06, step 7, we miscounted the total number of inches that we were going to need for the AN257-P3 hinge. It tells you to look on about 4 different pages and count up the number of inches you'll need. Step 7 was a little confusing in the wording but we figured out that they want you to take the 20 inch section and cut it in half, then pull the pin and that would give you 4 pieces of hinge. This was a really productive day, as we got over to the end of pg 21-08.
things are going a little smoother since we're getting the hang of the 'lingo' and I'm getting to know my partner a little better. He's a little older than me but a helluva lot wiser, AND it helps that he helped wire the C-5 here in Marietta Georgia.

Fluselage Progress 10/23/08


We're on pg 21-02 and there's a lot of dimpling do do. Make sure that you keep the dimple holes correct. Van's use a little confusing terminology here, like "dimple the nutplates", which should really say "dimple the areas where the nutplates go". (did you notice that they call them 'nutplates' here, whereas in earlier instructions they were called 'platenuts'...?). On step 14 when you're riveting the bearing bracket assembly together, make sure that you hold the brackets together firmly while riveting.
Something else we've been doing lately that helps me (the LD partner) and that is I've been using a yellow highliter to mark all the verbs, like "rivet, attach, cleco, screw, press", etc. It kinda keeps us on track.

RV 12 Fuselage Progress 10/18/08

On Pg 20-03 we started working on the bottom skin. We've been working on two sawhorses with a the shipping box on top. But we found that working with the f-1204 Center Section Assembly, that it was easier to remove the box and use a couple of long 2X4's or 2X6's on the sawhorses instead; that way we had access to more of the rivet holes and we could turn the assembly upside down (rightside up) for ease of assembly. We kept it that way until we actually started with the flooring assembly where we needed a larger flatter area. We found it helpful to use a magic marker and mark the areas on pg 20-04 where we were supposed to LEAVE OPEN.

RV 12 fuselage progress


We began construction of November 16th with the first page, 20-02. This kit has a LOT more little parts, so I got two shoe boxes, a box of sandwich baggies, a magic marker, and put all the rivets and small parts into baggies and put them in numerical sequence and then stood them up in the shoe boxes; a perfect fit! It makes life a lot easier. Try to position your work just as you see it and things will go a lot smoother. In order to keep from scratching up the aluminum too much, we used a hot iron (100 watt wood burning tool with a rounded head works great) to remove strips along the area where we will be riveting and screwing, etc.

Thursday, October 16, 2008

RV12 Fuselage, 1st page

We had/have a little problem today with the instructions; we're not sure which of the nutplates to use. We have a choice of the K1000-8, 3, 4, or 6 and Vans sent us three sizes in one bag...
We'll continue the saga tomorrow morning.

Tuesday, October 14, 2008

RV 12 fuselage


Well, the kit has arrived for the fuselage...or at least we went out to pick it up last night. the box weighs about 120 pounds and is 8 X 4 X 1. This one has a bunch of small parts and many, many, many small pieces of attaching hardware.

Saturday, June 14, 2008

Finished the wing...sort of


We closed up the right wing and put it on our wing rack along with the left wing. Now, we're starting on the flaperon in section 18. George was busy making the Actuation bracket from the stock material that was provided for us. George has kind of a machinist background in that he used to work for Lockheed and is familiar with the the drawings and dimensions. While George was busy with that, I was busy not reading the directions completely, again, and assembled the outboard nose ribs to the counterbalance. Yup, I did a really great job...until George pointed out that there was no mention of actually RIVETING the parts together. So, I drilled out just about all the rivets so we could install the pivot brackets and the A-1205 ribs. The photos are of George, pretending to measure for creation of some parts; of me drilling holes for the flaperon, the end of the counterbalance tube secured to the brace, and the hole that had to be drilled in the counterbalance tube.

Thursday, June 12, 2008

Skin placement on right wing.


Today,George, and I spent about 6 hours skinning the right wing. Everything was pretty uneventful; we just had to remember which side of the wing was up and which rivets to use in what holes. We seemed to have more problems stripping the !@#$%^ blue plastic protective coating off the wings. Using the soldering iron is pretty efficient, but I'm less patient than my partner and I tend to "hurry" when I'm stripping the stuff.


We didn't take my pics today.


Tuesday, June 10, 2008

Beginning the Right Wing for the RV12


Since we got the left wing together, and everything looks like a wing, we're on the right side. Everything went rather smoothly, until both George and I both, had a difficult time determining which way was us, so we call Van's and talked to Ken, and he very calmly assured us that we would be able to figure out our problem. ( We were trying to put the hinge assembly on while the wing was lying on our workbench, upside down...and of course it wouldn't fit in that position.)


Anyway, we put on the outboard, inboard, and middle skins, and got most of the riveting completed before we called it a day.

Wing Stand for the RV12


Well, we finished the Left wing so now we need a place to keep it, so we checked a couple of places and George had some plans that he liked, so we built his plans. It's kinda like an inverted "T" with a couple of slings made of old carpet. It's a really sturdy stand and well constructed and only cost us about 20 bucks. the stand is about 7 or 8 feet long and about 40 inches wide. It CAN be made more narrow and longer, if you like. It took the two of us about 4 hours to built, and we took our time.


Here's the pic's.


Saturday, June 7, 2008

Left wing closed


Today, we got everything together, all the holes filled with rivets or some other appropriate object, and the wing flipped back with the top of the wing facing up. We had a couple of pop rivets that didn't want to cooperate so we sent them to rivet Heaven and replaced them with rivets that would cooperate. We did notice some strange noises in the wing though, when we flipped it over. (...anybody know how to remove rivet nails from a sealed wing???)


We made the handy little tool for bending and we got all the angles pretty close, and that was pretty important in the assembly process in order to make everything fit.


I think we're going to go ahead and make some kind of cradle for the wing before we finish up the right wing, possibly using the suggested vehicle previously posted by Jerry.


We have a little concern about what shows on the underside of the wing, on the outboard side. You can see the factory spacers on the end piece; I just wonder if they knew that was going to be exposed.


Friday, June 6, 2008

RV12 Installing Wing Skins


We called Van's this am to tell them about our inability to install the center wing panel, and they told us to keep trying, which we did, and we eventually got it in. HOWEVER, I think if they had told us to not rivet the first two or three rivets closest to the center panel, on each inboard and outboard section, it would have made the installation much easier.


We had to drill out a couple of rivets again today, simply because there as too much head protruding.


We're just about ready to close the wing; the only remaining items left are the inspection plate on the underside and the panel on the outboard edge of the wing that has a number of tabs that are to be bent to varying degrees...that should be interesting.


I'm including photos of our "problem-child" center wing panel. Note the "J" curve in the skin of the center skin that needs to fit in the groove of the front nose ribs. If I were building this plane again, I'd probably sit down and figure out which panels would be exposed, and I'd 'etch' the blue film with the soldering gun, and pull the strips off that would expose the holes to be riveted. As it stands now, we have to stop and spend 5 or 10 minutes etching and stripping the wings.

Thursday, June 5, 2008

Closing the left wing process


We started about 10:00 this morning and George and I both agreed it was uncomfortable working. So, I thought if I bought a small airconditioner, it might help cool the garage...


Anyway, after we bought the AC and installed it, we realized that it was a waste, so we opened the doors back up and sweated in the 90 degree heat.


Back to the plane, we had the top skins on, on Tuesday, but today, we put on the bottom skins. We had a couple of 'difficult' rivets but George continues to hone his rivet-taking-out skills. Then, we forgot to take off the plastic coating on one of the skins that we had intstalled. Fortunately, we just had them cleco'd, and it was only a couple of minutes to take them off.


One of the photos, today, is of George using an old soldering iron to remove the blue film from the aluminum. It's really a slick way of just removing the tape around the area you are working. We also some problems with the hinge bracket assemblies on page 17-03. One of our rivets didn't grab the sheetmetal, we had to drill that one out also.


We quit around 7:30 feeling as though we had another enjoyable and productive day. This is a really great kit to build. The instructions are really GREAT!.

Tuesday, June 3, 2008

Installing the skins


Today is June 3rd and we are on page 17-02 We got the stall warning indicator functioning; we had to bend the main tab of the unit in order to get it functioning while positioned in it's slot. We laid the main skins on the inboard, outboard, and middle sections. To begin, we used a soldering iron to reveal the holes that we'd be using for the rivets. You simply heat up the tip and drag it slowly over the areas that you want revealed and pull away just the area that you'll be working on; that way, the rest of the 'skin' will be protected. We also needed to lap the inboard skin section edges to in order to make them fit correctly; read the section that they direct you to so that you can understand the process. My partner came up with an idea on how to do it without buying the special tool; we laid the skin on a solid surface, allowing about 1/4 inch to overhang the edge of the table, and then we took a block of 2x4 and held it at a slight angle, and bent the edge slightly by running the wood along the edge. Incidently, up to this point we haven't used 350 Clecos at any one point in time; it might be important when we do the fusilage though. Our rivet gun failed us and we had to figure out how to fix it since the factory couldn't figure out the solution to he problem. We also weren't paying attention to the directions as we put some rivets where they weren't supposed to go, but we drilled them out and continued on. The two of us worked about 8 hours today, one of our longer days. I've got some before and after photos, along with one showing how we lapped the edges of the middle skin.

Saturday, May 31, 2008

RV12 stallwarning switch


Today, May 31st, we worked on the stallwarning switch. Be very careful on installing the platenuts as there are two different sizes and we only received screws to fit the larger plate. We had to drill out the smaller platenuts and replace them with the size that fit our screws. We also went ahead and ran wires instead of the string through the ribs, in the event that they allow us to place lights on the wings. Also, the plans called for a 'Section 30" in the construction manual and we couldn't figure out what Vans was talking about.
Here are some of today's pics.

Sunday, May 18, 2008

Second day building RVq

Well, this was our second day and I think we're on page 14-2; we did the wing spar sub-assembly. It's going pretty quickly; we had some problems with the hydraulic rivet puller so we had to pull rivets by hand. We worked from 2:30 to 7 this evening. Today is May 19, 2008.
I'll try to post some more movies tomorrow.
thanks
Meade

Saturday, May 17, 2008

RV12 Wing Arrival

Well, the wing kit finally arrived and with the help of a very strong and helpful deliveryman, I was able to unload the wings and put them in the "hangar". Someone said that 2 men could easily handle the shipment but they must have meant that the men should be (1) younger than 60, or (2) weightlifters. My deliveryman was the latter.
Anyway, the delivery was on May 16th and today, my building partner and I completed the inventory process. It took us about 2 hours to demolish the shipping crates and count all the items. Incidently, the smaller of the box can be made into an adequate sized work table.
Van's used duct tape to secure and package the parts (they did a great job) but you've got to be careful in removing the tape in that it tends to pull off the plastic film from the wings.
Here are a couple of photos (I hope, since I've never used this service before) of the process of unloading and restacking the boxes.