Sunday, October 26, 2008

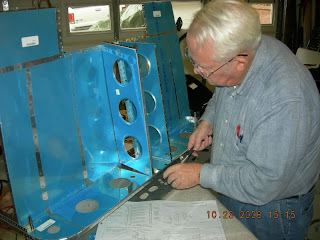
RV 12 fuselage progress 10/25/08


We got over to pg 21-04, step 6 on the 24th. We had some trouble with the rivet squeezer making contact with some of the flanges on step 5 and 6 but we straightened them out with a large duck-bill pliars.
On the 25th, we got a little backwards with some of the pulley bracket assembly and the flaperon mixer arm assembly; we tried to put them in the wrong place.
On pg 21-06, step 7, we miscounted the total number of inches that we were going to need for the AN257-P3 hinge. It tells you to look on about 4 different pages and count up the number of inches you'll need. Step 7 was a little confusing in the wording but we figured out that they want you to take the 20 inch section and cut it in half, then pull the pin and that would give you 4 pieces of hinge. This was a really productive day, as we got over to the end of pg 21-08.
things are going a little smoother since we're getting the hang of the 'lingo' and I'm getting to know my partner a little better. He's a little older than me but a helluva lot wiser, AND it helps that he helped wire the C-5 here in Marietta Georgia.

Fluselage Progress 10/23/08


We're on pg 21-02 and there's a lot of dimpling do do. Make sure that you keep the dimple holes correct. Van's use a little confusing terminology here, like "dimple the nutplates", which should really say "dimple the areas where the nutplates go". (did you notice that they call them 'nutplates' here, whereas in earlier instructions they were called 'platenuts'...?). On step 14 when you're riveting the bearing bracket assembly together, make sure that you hold the brackets together firmly while riveting.
Something else we've been doing lately that helps me (the LD partner) and that is I've been using a yellow highliter to mark all the verbs, like "rivet, attach, cleco, screw, press", etc. It kinda keeps us on track.

RV 12 Fuselage Progress 10/18/08

On Pg 20-03 we started working on the bottom skin. We've been working on two sawhorses with a the shipping box on top. But we found that working with the f-1204 Center Section Assembly, that it was easier to remove the box and use a couple of long 2X4's or 2X6's on the sawhorses instead; that way we had access to more of the rivet holes and we could turn the assembly upside down (rightside up) for ease of assembly. We kept it that way until we actually started with the flooring assembly where we needed a larger flatter area. We found it helpful to use a magic marker and mark the areas on pg 20-04 where we were supposed to LEAVE OPEN.

RV 12 fuselage progress


We began construction of November 16th with the first page, 20-02. This kit has a LOT more little parts, so I got two shoe boxes, a box of sandwich baggies, a magic marker, and put all the rivets and small parts into baggies and put them in numerical sequence and then stood them up in the shoe boxes; a perfect fit! It makes life a lot easier. Try to position your work just as you see it and things will go a lot smoother. In order to keep from scratching up the aluminum too much, we used a hot iron (100 watt wood burning tool with a rounded head works great) to remove strips along the area where we will be riveting and screwing, etc.

Thursday, October 16, 2008

RV12 Fuselage, 1st page

We had/have a little problem today with the instructions; we're not sure which of the nutplates to use. We have a choice of the K1000-8, 3, 4, or 6 and Vans sent us three sizes in one bag...
We'll continue the saga tomorrow morning.

Tuesday, October 14, 2008

RV 12 fuselage


Well, the kit has arrived for the fuselage...or at least we went out to pick it up last night. the box weighs about 120 pounds and is 8 X 4 X 1. This one has a bunch of small parts and many, many, many small pieces of attaching hardware.